uglide/azure-content
Repository containing the Articles on azure.microsoft.com Documentation Center - uglide/azure-content
github.com
Multi-step web tests
You can monitor a scenario that involves a sequence of URLs. For example, if you are monitoring a sales website, you can test that adding items to the shopping cart works correctly.
To create a multi-step test, you record the scenario by using Visual Studio, and then upload the recording to Application Insights. Application Insights will replay the scenario at intervals and verify the responses.
Note that you can't use coded functions in your tests: the scenario steps must be contained as a script in the .webtest file.
1. Record a scenario
Use Visual Studio Enterprise or Ultimate to record a web session.
-
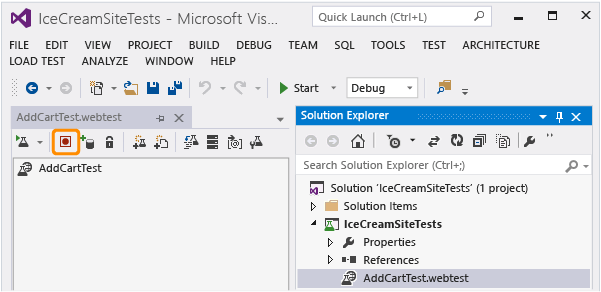
Create a web performance test project.

-
Open the .webtest file and start recording.

-
Do the user actions you want to simulate in your test: open your website, add a product to the cart, and so on. Then stop your test.

Don't make a long scenario. There's a limit of 100 steps and 2 minutes.
-
Edit the test to:
-
Add validations to check the received text and response codes.
-
Remove any superfluous interactions. You could also remove dependent requests for pictures or to ad or tracking sites.
Remember that you can only edit the test script - you can't add custom code or call other web tests. Don't insert loops in the test. You can use standard web test plug-ins.
-
Run the test in Visual Studio to make sure it works.
The web test runner opens a web browser and repeats the actions you recorded. Make sure it works as you expect.

2. Upload the web test to Application Insights
-
In the Application Insights portal, create a new web test.

-
Select multi-step test, and upload the .webtest file.
Set the test locations, frequency, and alert parameters in the same way as for ping tests.
View your test results and any failures in the same way as for single-url tests.
A common reason for failure is that the test runs too long. It mustn't run longer than two minutes.
Don't forget that all the resources of a page must load correctly for the test to succeed, including scripts, style sheets, images and so forth.
Note that the web test must be entirely contained in the .webtest file: you can't use coded functions in the test.
Plugging time and random numbers into your multi-step test
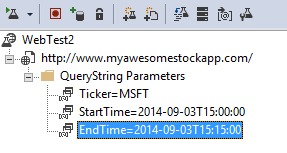
Suppose you're testing a tool that gets time-dependent data such as stocks from an external feed. When you record your web test, you have to use specific times, but you set them as parameters of the test, StartTime and EndTime.

When you run the test, you'd like EndTime always to be the present time, and StartTime should be 15 minutes ago.
Web Test Plug-ins provide the way to do this.
-
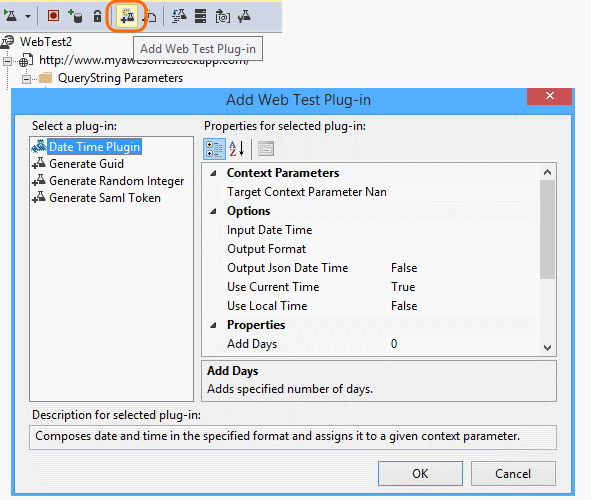
Add a web test plug-in for each variable parameter value you want. In the web test toolbar, choose Add Web Test Plugin.

In this example, we'll use two instances of the Date Time Plug-in. One instance is for "15 minutes ago" and another for "now".
-
Open the properties of each plug-in. Give it a name and set it to use the current time. For one of them, set Add Minutes = -15.

-
In the web test parameters, use {{plug-in name}} to reference a plug-in name.

Now, upload your test to the portal. It will use the dynamic values on every run of the test.
Dealing with sign-in
If your users sign in to your app, you have a number of options for simulating sign-in so that you can test pages behind the sign-in. The approach you use depends on the type of security provided by the app.
In all cases, you should create an account just for the purpose of testing. If possible, restrict its permissions so that it's read-only.
- Simple username and password: Just record a web test in the usual way. Delete cookies first.
- SAML authentication. For this, you can use the SAML plugin that is available for web tests.
- Client secret: If your app has a sign-in route that involves a client secret, use that. Azure Active Directory provides this.
- Open Authentication - for example, signing in with your Microsoft or Google account. Many apps that use OAuth provide the client secret alternative, so the first tactic is to investigate that. If your test has to sign in using OAuth, the general approach is:
- Use a tool such as Fiddler to examine the traffic between your web browser, the authentication site, and your app.
- Perform two or more sign-ins using different machines or browsers, or at long intervals (to allow tokens to expire).
- By comparing different sessions, identify the token passed back from the authenticating site, that is then passed to your app server after sign-in.
- Record a web test using Visual Studio.
- Parameterize the tokens, setting the parameter when the token is returned from the authenticator, and using it in the query to the site. (Visual Studio will attempt to parameterize the test, but will not correctly parameterize the tokens.)
Edit or disable a test
Open an individual test to edit or disable it.

You might want to disable web tests while you are performing maintenance on your service.
Performance tests
You can run a load test on your website. Like the availability test, you can send either simple requests or multi-step requests from our points around the world. Unlike an availability test, many requests are sent, simulating multiple simultaneous users.
From the Overview blade, open Settings, Performance Tests. When you create a test, you are invited to connect to or create a Visual Studio Team Services account.
When the test is complete, you'll be shown response times and success rates.
Automation
- Use PowerShell scripts to set up a web test automatically.
- Set up a webhook that is called when an alert is raised.
'푸닥거리' 카테고리의 다른 글
| IIS에서 apk 파일 다운로드 가능하도록 설정 (0) | 2020.09.14 |
|---|---|
| 딥러닝을 활용한 이미지 처리 (0) | 2020.08.08 |
| 데이터 분석 라이브러리 (0) | 2020.07.30 |
| 딥러닝을 활용한 자연어 처리 (1) | 2020.07.04 |
| hash-based message authentication code (0) | 2020.02.24 |


댓글