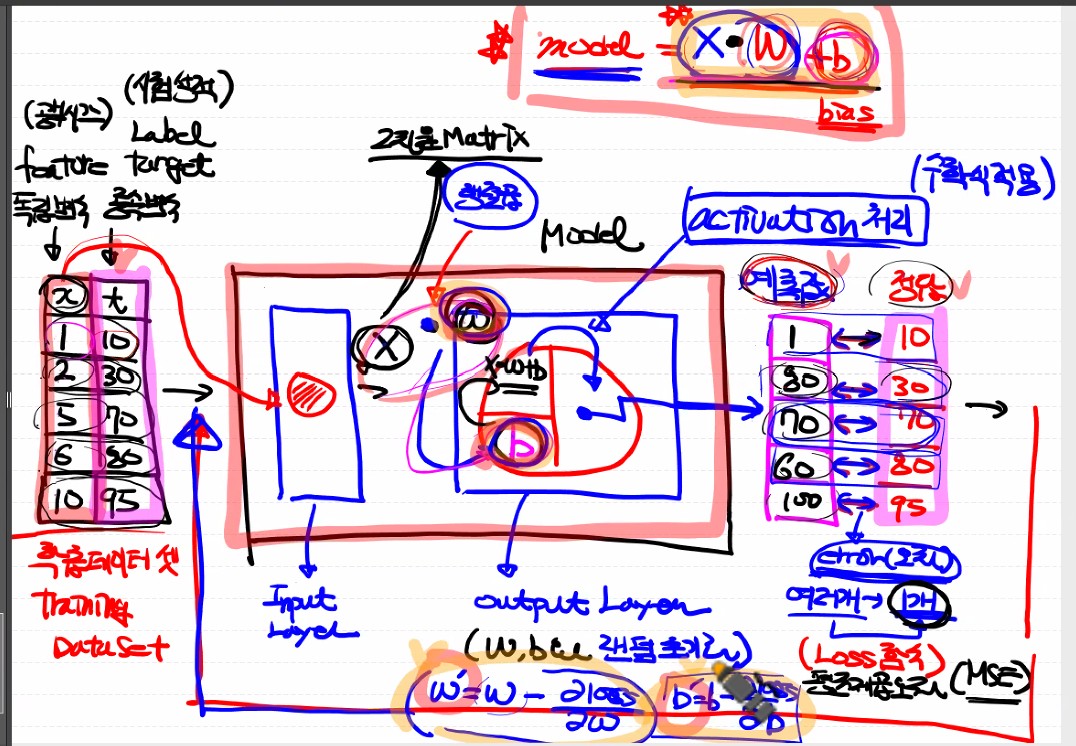
출처: 문성훈 강사님

출처: 문성훈 강사님
하이퍼파라미터란?
하이퍼파라미터(Hyperparameter)는 머신러닝 모델의 학습 과정과 구조를 제어하는 변수로, 모델이 학습되기 전에 사람이 설정해야 하는 값들입니다. 하이퍼파라미터는 모델의 성능과 학습 속도에 큰 영향을 미칩니다.
주요 하이퍼파라미터의 예:
- 학습률(Learning Rate):
- 모델이 가중치를 업데이트할 때 사용하는 스텝 크기.
- 너무 작으면 학습이 느리고, 너무 크면 최적값을 넘어서거나 수렴하지 않음.
- 배치 크기(Batch Size):
- 학습 과정에서 한 번에 처리하는 데이터 샘플의 수.
- 작은 배치는 더 자주 업데이트를 하지만, 큰 배치는 학습이 안정적임.
- 에포크(Epoch):
- 전체 데이터셋을 몇 번 반복해서 학습할지 결정.
- 은닉층 크기와 노드 수:
- 딥러닝 모델에서 각 레이어의 노드 수와 레이어 개수.
- 활성화 함수(Activation Function):
- 각 노드에서 입력 데이터를 처리하는 방법.
- 예: ReLU, Sigmoid, Tanh.
- 손실 함수(Loss Function):
- 모델의 예측값과 실제값 간의 차이를 측정.
- 회귀: Mean Squared Error, 분류: Cross-Entropy.
- 최적화 알고리즘(Optimizer):
- 학습 과정을 제어하는 알고리즘.
- 예: SGD, Adam, RMSprop.
하이퍼파라미터 찾는 방법
하이퍼파라미터 튜닝은 적절한 값을 찾는 과정입니다. 이를 위해 다양한 기법이 사용됩니다:
1. 그리드 서치(Grid Search)
- 미리 정의된 하이퍼파라미터 값의 조합을 전부 탐색.
- 예를 들어, 학습률 [0.1, 0.01, 0.001]과 배치 크기 [16, 32, 64] 조합을 테스트.
- 장점: 모든 조합을 실험하여 최적 값을 보장.
- 단점: 계산 비용이 많이 듦.
2. 랜덤 서치(Random Search)
- 하이퍼파라미터 값을 무작위로 선택하여 탐색.
- 장점: 계산 비용이 적고, 높은 차원의 조합에서 효율적.
- 단점: 최적의 조합을 놓칠 가능성이 있음.
3. 베이지안 최적화(Bayesian Optimization)
- 이전의 탐색 결과를 바탕으로 하이퍼파라미터 조합을 효율적으로 선택.
- 예: Hyperopt, Optuna 라이브러리.
- 장점: 효율적이고 계산 비용이 적음.
4. 그리디 서치(Hill Climbing)
- 특정 하이퍼파라미터를 고정하고, 나머지를 점진적으로 조정하며 탐색.
5. 교차 검증(Cross-Validation)
- 여러 데이터 분할로 모델을 학습시켜 하이퍼파라미터의 성능을 평가.
- 하이퍼파라미터 조합별로 교차 검증 점수를 확인.
6. 자동화된 튜닝 도구
- 머신러닝 프레임워크에서 제공하는 도구를 활용.
- 예:
- Keras Tuner
- Scikit-learn의 GridSearchCV 및 RandomizedSearchCV
- Ray Tune
실제 코드 예제: Keras Tuner를 사용한 튜닝
import keras_tuner as kt
from tensorflow.keras.models import Sequential
from tensorflow.keras.layers import Dense

# 모델 빌더 함수
def build_model(hp):
    model = Sequential()
    model.add(Dense(units=hp.Int('units', min_value=32, max_value=512, step=32),
                    activation='relu', input_shape=(10,)))
    model.add(Dense(1, activation='linear'))
    model.compile(optimizer=hp.Choice('optimizer', ['adam', 'sgd']),
                  loss='mse',
                  metrics=['mae'])
    return model

# 튜너 생성
tuner = kt.RandomSearch(
    build_model,
    objective='val_mae',
    max_trials=10,
    directory='my_dir',
    project_name='intro_to_kt'
)

# 데이터 로드 및 튜닝 실행
x_train, y_train = ...  # 학습 데이터
tuner.search(x_train, y_train, epochs=10, validation_split=0.2)

# 최적의 하이퍼파라미터 출력
best_hps = tuner.get_best_hyperparameters(num_trials=1)[0]
print(f"Best units: {best_hps.get('units')}, Best optimizer: {best_hps.get('optimizer')}")
요약:
- 하이퍼파라미터는 모델 성능에 큰 영향을 미치는 중요한 설정 값들입니다.
- 그리드 서치, 랜덤 서치, 베이지안 최적화 등 다양한 방법을 사용해 최적의 값을 찾습니다.
- 효율적인 도구와 기법을 사용하면 튜닝 시간을 절약할 수 있습니다.
import numpy as np
from tensorflow.keras.models import Sequential
from tensorflow.keras.layers import Flatten, Dense
from tensorflow.keras.optimizers import SGD

# Training Data Set 독립변수
x_data = np.array([[2, 1], [3, 2], [4, 3], [10,1]])
t_data = np.array([0, 0, 1, 1]).reshape(-1,1)

# model 구현
model = Sequential()

# Layer 추가
model.add(Flatten(input_shape=(2,)))
model.add(Dense(units=5,
                activation='relu')) # 히든레이어
model.add(Dense(units=1,
               activation="sigmoid")) # output 레이어

# model 설정
model.compile(optimizer=SGD(learning_rate=1e-4),
              loss="binary_crossentropy")

# model 학습
model.fit(x_data,
          t_data,
          epochs=100,
          verbose=1)
# 모델이 완성되었으니
# 예측을 시작 합니다. 궁금한 것을 질문

my_data = np.array([6,1]).reshape(1,2) # 6시간 공부, 1년 연수

result = model.predict(my_data)

print(result) # [[0.8945512]] 1과 가까울수록 합격
오버피팅(Overfitting)이란?
오버피팅은 머신러닝에서 모델이 학습 데이터에 지나치게 적합하여, 새로운 데이터(테스트 데이터 또는 실제 환경 데이터)에서는 일반화 성능이 떨어지는 현상을 말합니다. 즉, 모델이 학습 데이터의 패턴뿐만 아니라 노이즈나 불필요한 세부사항까지 학습한 상태입니다.
오버피팅의 특징
- 학습 데이터에서 높은 성능을 보이지만, 테스트 데이터나 실제 데이터에서는 성능이 저하됩니다.
- 모델이 데이터의 복잡한 구조를 과도하게 학습하여 일반화되지 않는 규칙을 만들어냅니다.
- 과도하게 복잡한 모델(예: 너무 많은 매개변수, 깊은 신경망 구조 등)에서 자주 발생합니다.
오버피팅의 원인
- 학습 데이터 부족:
- 데이터가 충분하지 않으면 모델이 적은 데이터에서 나타나는 패턴이나 노이즈를 과대평가합니다.
- 모델의 복잡도 과도:
- 너무 많은 파라미터(예: 레이어 개수, 노드 수 등)를 가진 모델은 데이터를 과도하게 학습하게 됩니다.
- 특징 부족 또는 잘못된 특징 사용:
- 학습 데이터가 충분히 설명하지 못하는 상황에서 모델이 불필요한 관계를 학습합니다.
- 노이즈 포함:
- 학습 데이터에 노이즈가 포함되어 있으면, 모델이 이를 패턴으로 잘못 학습할 수 있습니다.
오버피팅의 예
- 예를 들어, 데이터를 사용해 학습한 회귀 모델이 너무 많은 차수의 다항식을 사용하면, 아래와 같이 학습 데이터에 완전히 맞는 곡선을 생성할 수 있습니다.
오버피팅의 시각적 예
- 언더피팅(Underfitting): 데이터의 패턴을 제대로 학습하지 못함.
- 적절한 피팅(Good Fit): 데이터의 일반적인 패턴을 잘 학습함.
- 오버피팅(Overfitting): 데이터의 노이즈까지 과도하게 학습함.
오버피팅을 방지하는 방법
- 데이터 확장 및 다양성 증가:
- 더 많은 데이터를 수집하거나, 데이터 증강(Data Augmentation)을 통해 데이터의 다양성을 늘립니다.
- 정규화(Regularization):
- L1/L2 정규화: 모델의 가중치를 제약하여 복잡도를 줄임.
- 드롭아웃(Dropout): 학습 중 무작위로 일부 뉴런을 비활성화하여 과적합 방지.
- 간단한 모델 사용:
- 복잡도를 줄이고, 학습할 파라미터 수를 줄입니다.
- 교차 검증(Cross-Validation):
- 데이터를 여러 조각으로 나누어 모델을 평가하여 일반화 성능을 확인합니다.
- 조기 종료(Early Stopping):
- 학습 데이터의 성능은 계속 증가하지만, 검증 데이터 성능이 떨어지기 시작할 때 학습을 멈춥니다.
- 특징 선택(Feature Selection):
- 중요한 특징만 선택하고, 불필요하거나 중복된 특징을 제거합니다.
- 데이터 분할:
- 데이터를 학습용, 검증용, 테스트용으로 나누어 일반화 성능을 평가합니다.
오버피팅 확인 방법
- 학습 손실 vs 검증 손실:
- 학습 손실은 감소하지만, 검증 손실이 증가하면 오버피팅의 신호입니다.
- 학습 정확도 vs 검증 정확도:
- 학습 정확도가 높고, 검증 정확도가 낮다면 오버피팅이 발생한 것입니다.
요약
- 오버피팅은 모델이 학습 데이터에 지나치게 적합하여 일반화 성능이 떨어지는 현상입니다.
- 이를 방지하려면 데이터 확장, 정규화, 조기 종료, 교차 검증 등의 방법을 사용할 수 있습니다.
- 오버피팅을 피하는 것이 머신러닝 모델의 일반화 성능을 향상시키는 핵심 과제입니다.
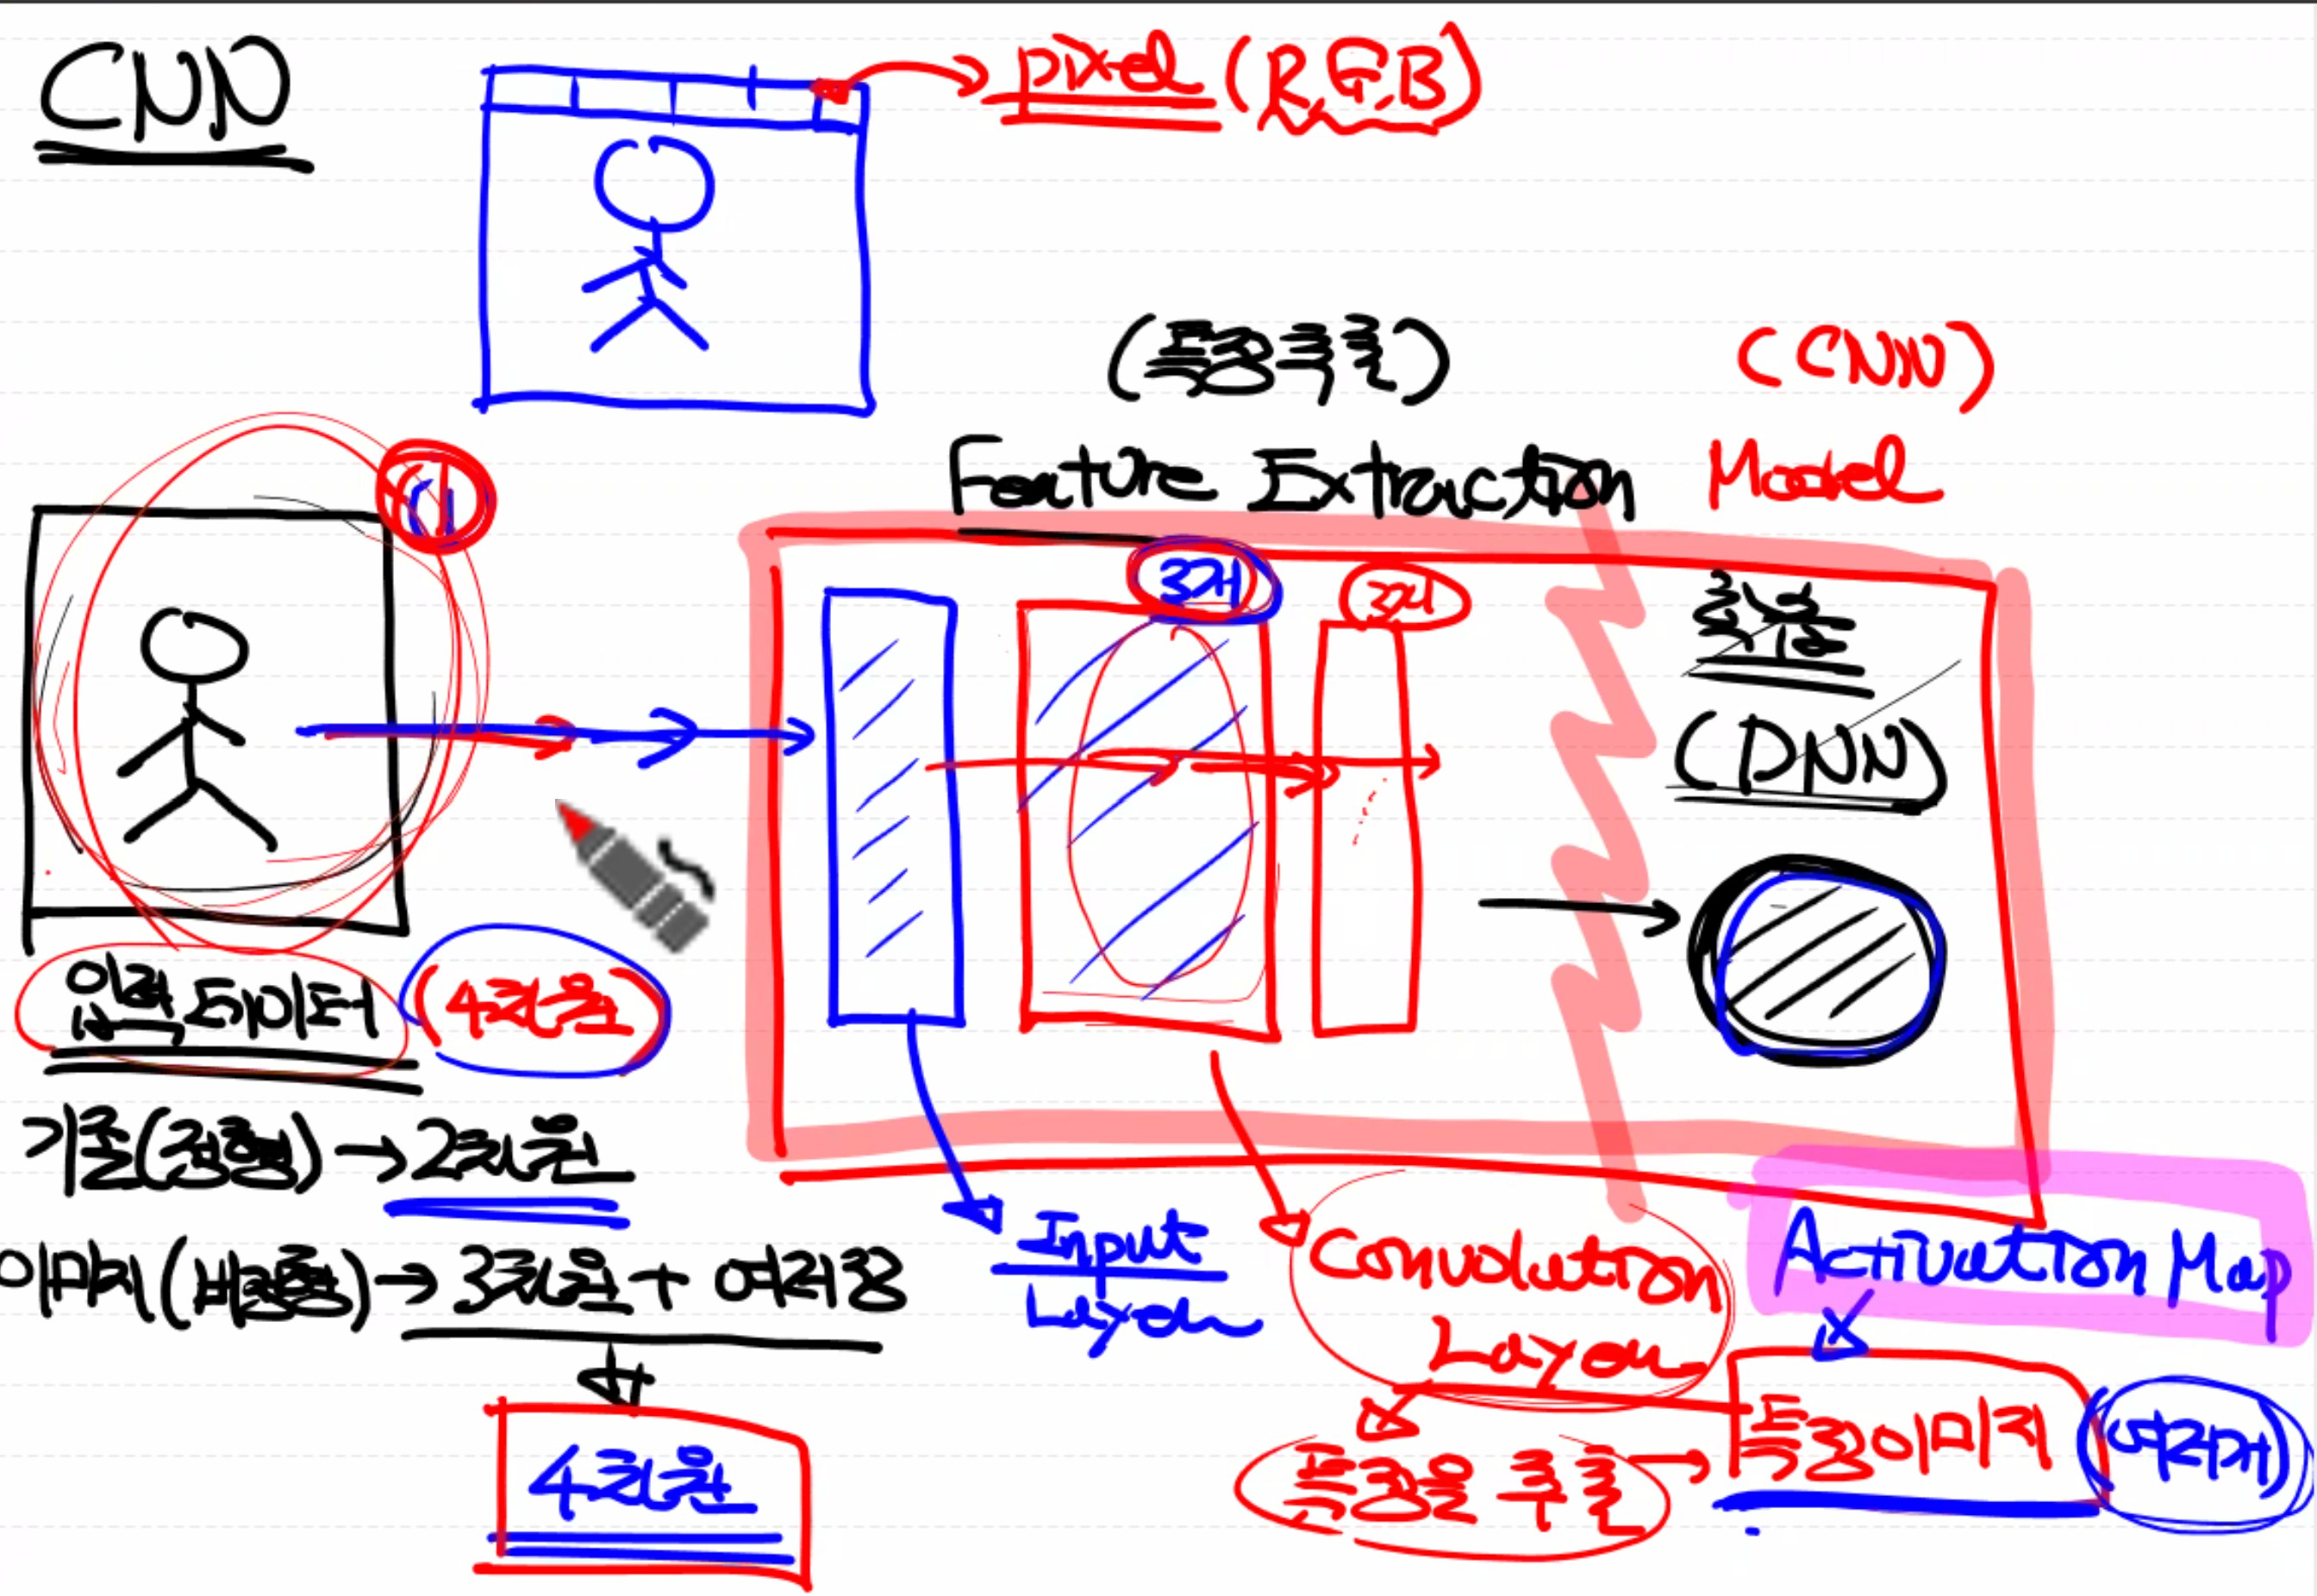
출처: 문성훈 강사님
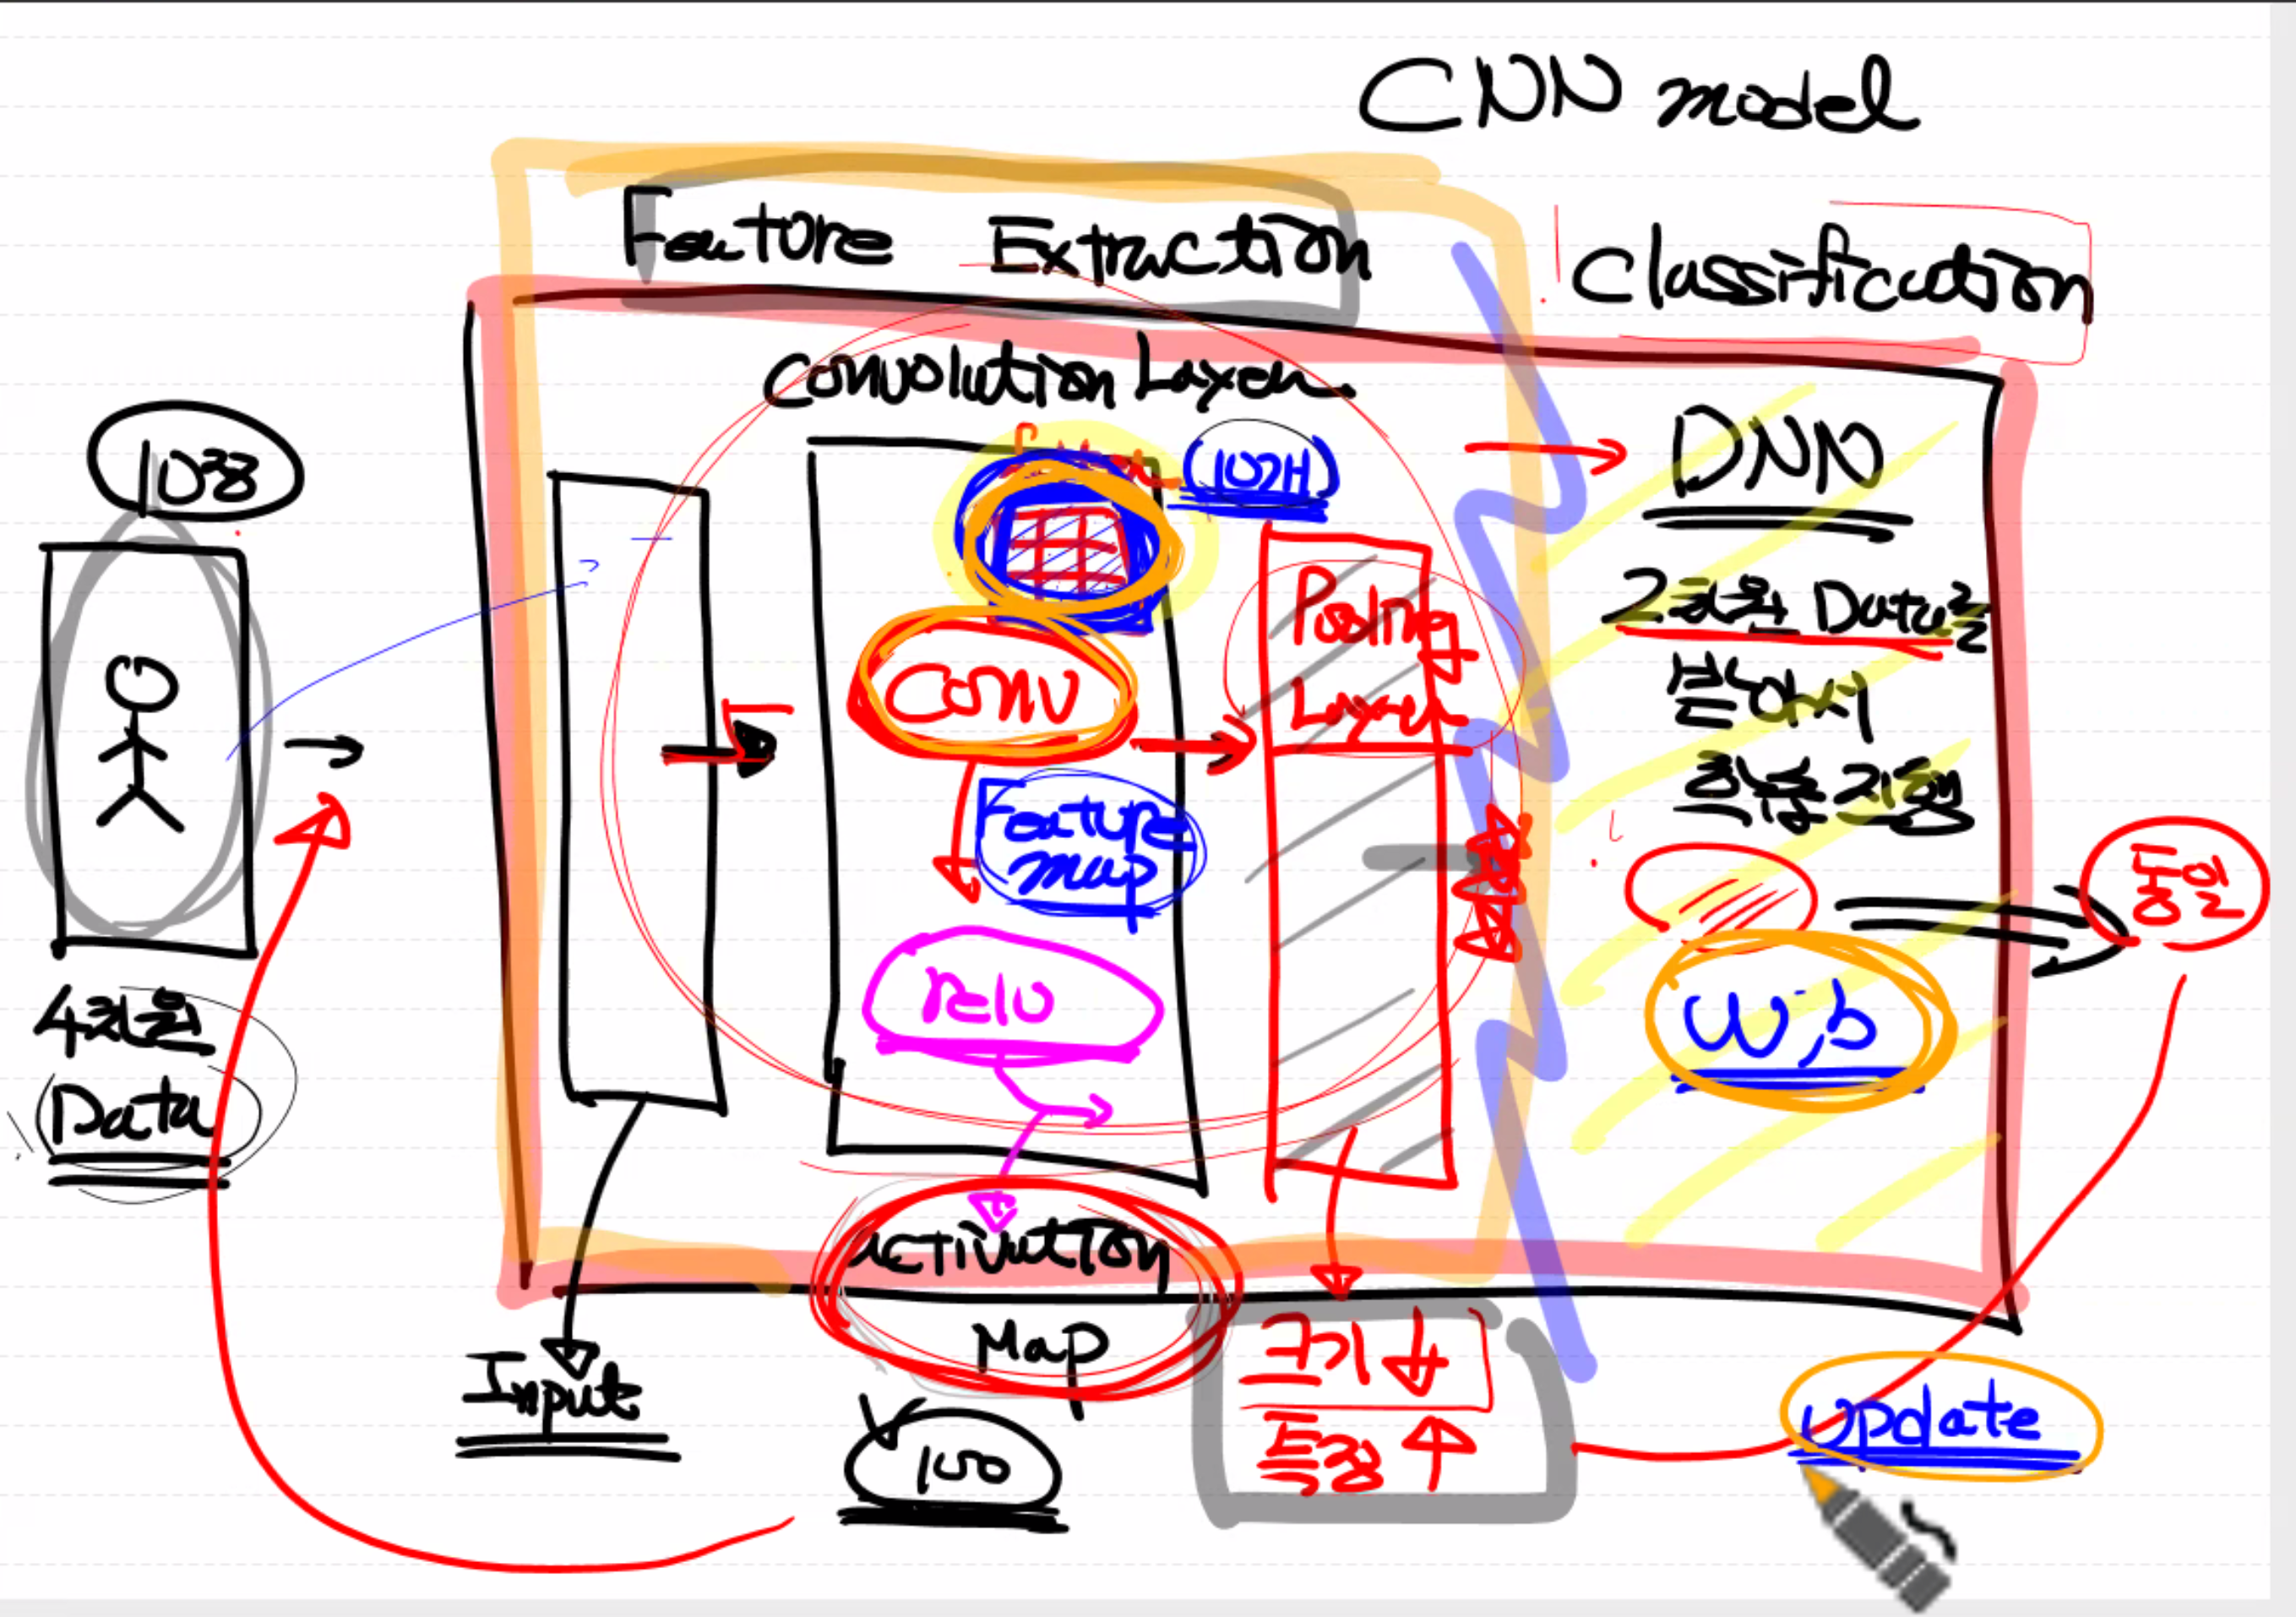
출처: 문성훈 강사님
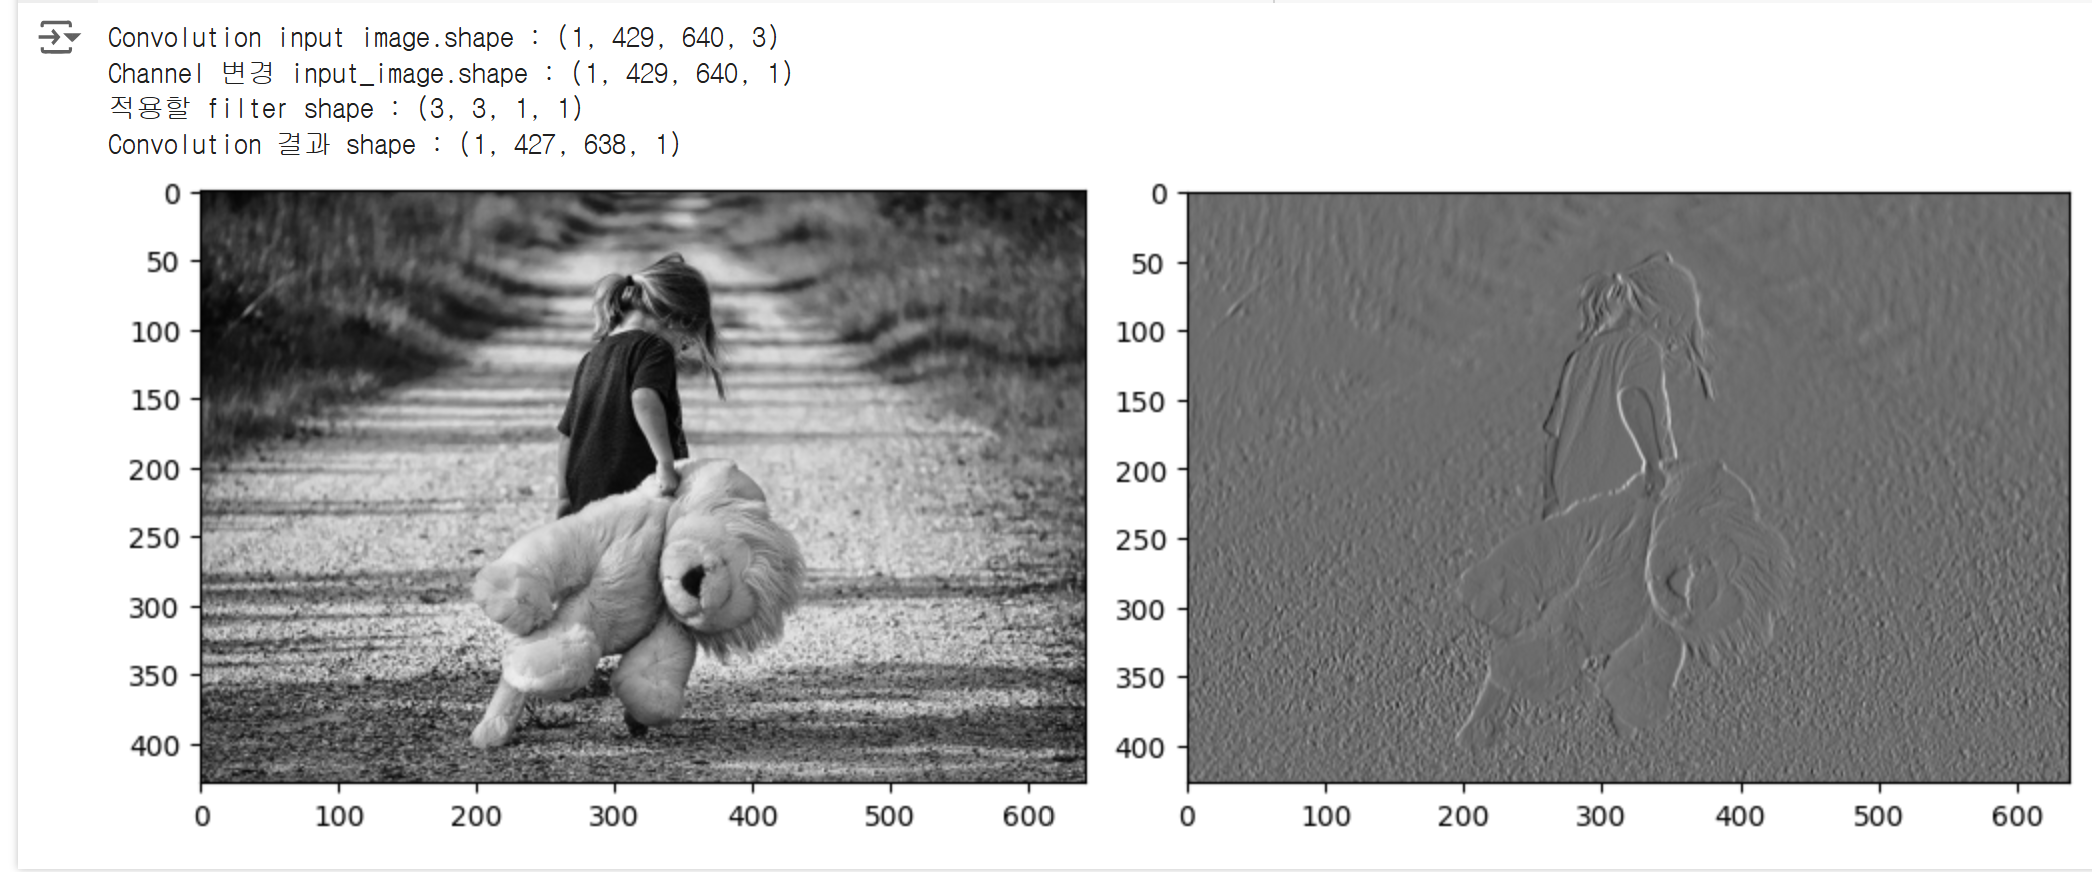
import numpy as np
import tensorflow as tf
import matplotlib.pyplot as plt
import matplotlib.image as img

fig = plt.figure(figsize=(10,10))  # 가로세로 크기 inch단위

ax1 = fig.add_subplot(1,2,1)
ax2 = fig.add_subplot(1,2,2)

ori_image = img.imread('./girl.png')
ax1.imshow(ori_image)

# 원본 이미지의 shape : (429, 640, 3) => (height, width, color)

# 입력이미지의 형태
# (1, 429, 640, 3) => (이미지 개수, height, width, color)
input_image = ori_image.reshape((1,) + ori_image.shape)
input_image = input_image.astype(np.float32)
print('Convolution input image.shape : {}'.format(input_image.shape))

# 입력이미지 channel 변경
# (1, 429, 640, 1) => (이미지 개수, height, width, color)
# slicing을 이용하여 첫번째 R(Red) 값만 이용
channel_1_input_image = input_image[:,:,:,0:1]
print('Channel 변경 input_image.shape : {}'.format(channel_1_input_image.shape))


# filter
# (3,3,1,1) => (filter height, filter width, filter channel, filter 개수)
# weight = np.random.rand(3,3,1,1)
weight = np.array([[[[-1]],[[0]],[[1]]],
                   [[[-1]],[[0]],[[1]]],
                   [[[-1]],[[0]],[[1]]]])
print('적용할 filter shape : {}'.format(weight.shape))

# stride : 1 (가로1, 세로1)
# padding = 'VALID'

conv2d = tf.nn.conv2d(channel_1_input_image,
                      weight,
                      strides=[1,1,1,1],
                      padding='VALID')

conv2d_result = conv2d.numpy()

print('Convolution 결과 shape : {}'.format(conv2d_result.shape))

# 아래의 코드는 이미지가 1장이기 때문에 필요없다.
# i = np.swapaxes(conv2d_result,0,3)    # (1, 424, 638, 1)
#                                       # (이미지개수, height, weight, filter 수)
#                                       # filter수만큼 loop 돌리기 위해 axes swap

# for filter_idx, t_img in enumerate(i):
#     ax2.imshow(t_img)

t_img = conv2d_result[0,:,:,:]
ax2.imshow(t_img, cmap='gray')

fig.tight_layout()
plt.show()
import numpy as np
import tensorflow as tf
import matplotlib.pyplot as plt
import matplotlib.image as img

fig = plt.figure(figsize=(10,10))  # 가로세로 크기 inch단위

ax1 = fig.add_subplot(1,4,1)
ax2 = fig.add_subplot(1,4,2)
ax3 = fig.add_subplot(1,4,3)
ax4 = fig.add_subplot(1,4,4)

ori_image = img.imread('./girl.png')
ax1.imshow(ori_image)

# 원본 이미지의 shape : (429, 640, 3) => (height, width, color)

# 입력이미지의 형태
# (1, 429, 640, 3) => (이미지 개수, height, width, color)
input_image = ori_image.reshape((1,) + ori_image.shape)
input_image = input_image.astype(np.float32)
print('Convolution input image.shape : {}'.format(input_image.shape))

# 입력이미지 channel 변경
# (1, 429, 640, 1) => (이미지 개수, height, width, color)
# slicing을 이용하여 첫번째 R(Red) 값만 이용
channel_1_input_image = input_image[:,:,:,0:1]
print('Channel 변경 input_image.shape : {}'.format(channel_1_input_image.shape))


# filter
# (3,3,1,3) => (filter height, filter width, filter channel, filter 개수)
# weight = np.random.rand(3,3,1,3)
weight = np.array([[[[-1,-1,-1]],[[0,0,-2]],[[1,1,-1]]],
                   [[[-1,-2,0]],[[0,0,0]],[[1,2,0]]],
                   [[[-1,-1,1]],[[0,0,2]],[[1,1,1]]]])
print('적용할 filter shape : {}'.format(weight.shape))

# 수직선을 강조하는 필터
# [[-1, 0, 1],
#  [-2, 0, 2]
#  [-1, 0, 1]]

# 수평선을 강조하는 필터
# [[-1, -2, -1],
#  [0, 0, 0]
#  [1, 2, 1]]


# stride : 1 (가로1, 세로1)
# padding = 'VALID'

conv2d = tf.nn.conv2d(channel_1_input_image,
                      weight,
                      strides=[1,1,1,1],
                      padding='VALID')

conv2d_result = conv2d.numpy()

print('Convolution 결과 shape : {}'.format(conv2d_result.shape))

# 아래의 코드는 이미지가 1장이기 때문에 필요없다.
# i = np.swapaxes(conv2d_result,0,3)    # (1, 424, 638, 3)
#                                       # (이미지개수, height, weight, filter 수)
#                                       # filter수만큼 loop 돌리기 위해 axes swap

# for filter_idx, t_img in enumerate(i):
#     ax2.imshow(t_img)

ax2.imshow(conv2d_result[0,:,:,0], cmap='gray')
ax3.imshow(conv2d_result[0,:,:,1], cmap='gray')
ax4.imshow(conv2d_result[0,:,:,2], cmap='gray')

fig.tight_layout()
plt.show()

import numpy as np
import tensorflow as tf
import matplotlib.pyplot as plt
import matplotlib.image as img

fig = plt.figure(figsize=(10,10))  # 가로세로 크기 inch단위

ax1 = fig.add_subplot(1,3,1)
ax2 = fig.add_subplot(1,3,2)
ax3 = fig.add_subplot(1,3,3)

ori_image = img.imread('./girl.png')
ax1.imshow(ori_image)

# 원본 이미지의 shape : (429, 640, 3) => (height, width, color)

# 입력이미지의 형태
# (1, 429, 640, 3) => (이미지 개수, height, width, color)
input_image = ori_image.reshape((1,) + ori_image.shape)
input_image = input_image.astype(np.float32)
print('Convolution input image.shape : {}'.format(input_image.shape))

# 입력이미지 channel 변경
# (1, 429, 640, 1) => (이미지 개수, height, width, color)
# slicing을 이용하여 첫번째 R(Red) 값만 이용
channel_1_input_image = input_image[:,:,:,0:1]
print('Channel 변경 input_image.shape : {}'.format(channel_1_input_image.shape))


# filter
# (3,3,1,1) => (filter height, filter width, filter channel, filter 개수)
# weight = np.random.rand(3,3,1,1)
weight = np.array([[[[-1]],[[0]],[[1]]],
                   [[[-1]],[[0]],[[1]]],
                   [[[-1]],[[0]],[[1]]]])
print('적용할 filter shape : {}'.format(weight.shape))

# stride : 1 (가로1, 세로1)
# padding = 'VALID'

conv2d = tf.nn.conv2d(channel_1_input_image,
                      weight,
                      strides=[1,1,1,1],
                      padding='VALID')

conv2d_result = conv2d.numpy()

print('Convolution 결과 shape : {}'.format(conv2d_result.shape))

# 아래의 코드는 이미지가 1장이기 때문에 필요없다.
# i = np.swapaxes(conv2d_result,0,3)    # (1, 424, 638, 1)
#                                       # (이미지개수, height, weight, filter 수)
#                                       # filter수만큼 loop 돌리기 위해 axes swap

# for filter_idx, t_img in enumerate(i):
#     ax2.imshow(t_img)

t_img = conv2d_result[0,:,:,:]
ax2.imshow(t_img, cmap='gray')

## pooling 처리 ##

# ksize = pooling filter의 크기
pool = tf.nn.max_pool(conv2d_result,
                      ksize=[1,3,3,1],
                      strides=[1,3,3,1],
                      padding='VALID')

pool_result = pool.numpy()
print('Pooling한 결과 shape : {}'.format(pool_result.shape))

t_img = pool_result[0,:,:,:]
ax3.imshow(t_img, cmap='gray')

fig.tight_layout()
plt.show()

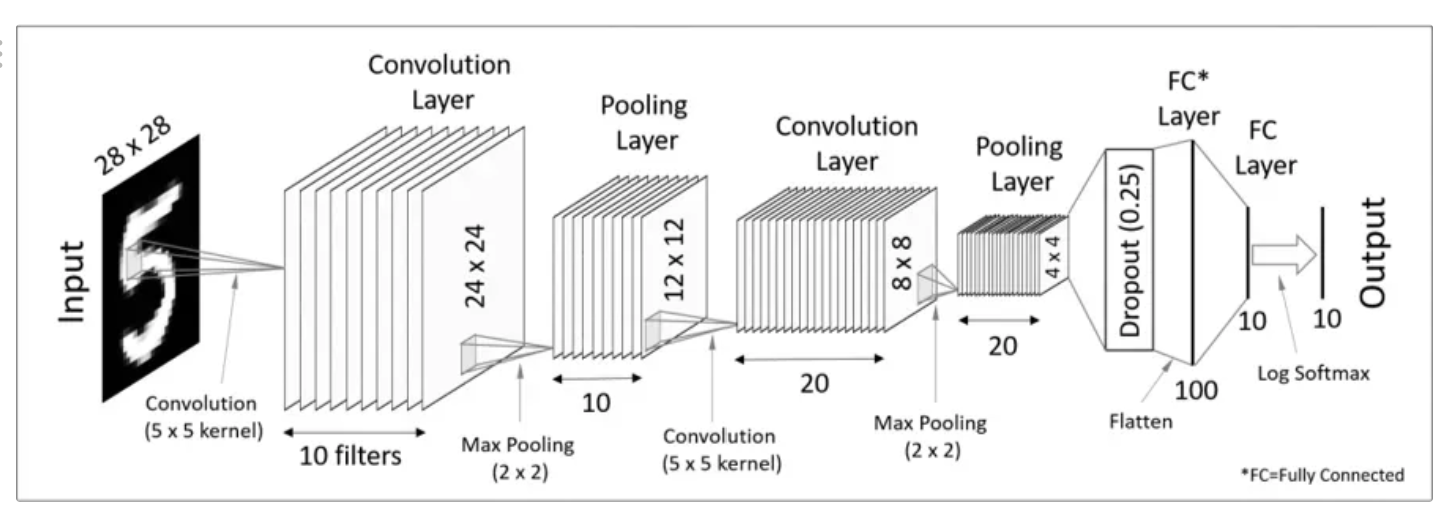

# 다중 분류를 구현 ( Multinomial Classification )
# 데이터는 MNIST 데이터셋을 이용
# MNIST 데이터셋은 이미지 1장이 1차원으로 이미 구현
# 데이터부터 먼저 살펴 봄

# 이미지 1장 ( 28 x 28 pixel ) 이미지를 1차원으로 펼쳐 놓은 데이터

# 일단 DNN 부터

import numpy as np
import pandas as pd
import tensorflow as tf
from tensorflow.keras.models import Sequential
from tensorflow.keras.layers import Flatten, Dense, Conv2D
from tensorflow.keras.layers import Dropout, MaxPooling2D
from tensorflow.keras.optimizers import SGD
from sklearn.preprocessing import MinMaxScaler
from sklearn.model_selection import train_test_split
from sklearn.metrics import classification_report
import matplotlib.pyplot as plt
import warnings

# 1단계 Raw Data Loading
df = pd.read_csv('./train.csv')
# display(df.head(), df.shape)

# 데이터 전처리를 해야 함 ( 결측지, 이상치, 정규화, 기타 등등 )
# 이 MNIST 는 학습용 데이터이기 때문에 별도의 결측치, 이상치가 존재하지 않음

##### 이미지 확인 #####
img_data = df.drop('label', axis=1, inplace=False).values

fig = plt.figure()
fig_arr = []

for n in range(10):
    fig_arr.append(fig.add_subplot(2,5,n+1))
    fig_arr[n].imshow(img_data[n].reshape(28,28),
                      cmap='gray',
                      interpolation='nearest')

plt.tight_layout()
plt.show()


출처: 문성훈 강사님
# 독립변수 종속변수 분리
x_data = df.drop('label', axis=1, inplace=False)
t_data = df['label']   # one-hot 처리해야 함.


# Normalization (정규화 진행!)
scaler = MinMaxScaler()
scaler.fit(x_data)
x_data_norm = scaler.transform(x_data)

# Data Split
x_data_train_norm, x_data_test_norm, t_data_train, t_data_test = \
train_test_split(x_data_norm,
                 t_data,
                 test_size=0.3,
                 random_state=0)

# 모델 만드기 시작
model = Sequential()

model.add(Flatten(input_shape=(784,)))

# 히든레이어1
model.add(Dense(units=256,
                activation='relu'))

# 히든레이어2
model.add(Dense(units=128,
                activation='relu'))

# output 레이어 unit 은 클래스 수만큼
model.add(Dense(units=10,
                activation='softmax'))

model.compile(optimizer=SGD(learning_rate=1e-1),
              loss='sparse_categorical_crossentropy',
              metrics=['accuracy'])

history = model.fit(x_data_train_norm,
                    t_data_train,
                    epochs=100,
                    batch_size=100,
                    validation_split=0.3,
                    verbose=1)

# 같은 데이터를 CNN 을 이용하여 구현

%reset

import numpy as np
import pandas as pd
import tensorflow as tf
from tensorflow.keras.models import Sequential
from tensorflow.keras.layers import Flatten, Dense, Conv2D
from tensorflow.keras.layers import Dropout, MaxPooling2D
from tensorflow.keras.optimizers import Adam
from sklearn.preprocessing import MinMaxScaler
from sklearn.model_selection import train_test_split
from sklearn.metrics import classification_report
import matplotlib.pyplot as plt
import warnings

warnings.filterwarnings(action='ignore')

# Raw Data Loading
df = pd.read_csv('./train.csv')

# 결측치 이상치 없음.

# feature engineering
# 할게 없음.

# 독립변수 종속변수 분리
x_data = df.drop('label', axis=1, inplace=False)
t_data = df['label']   # one-hot 처리해야 함.

# Normalization
scaler = MinMaxScaler()
scaler.fit(x_data)
x_data_norm = scaler.transform(x_data)

# Data Split
x_data_train_norm, x_data_test_norm, t_data_train, t_data_test = \
train_test_split(x_data_norm,
                 t_data,
                 test_size=0.3,
                 random_state=0)

##### Tensorflow 2.x implementation #####

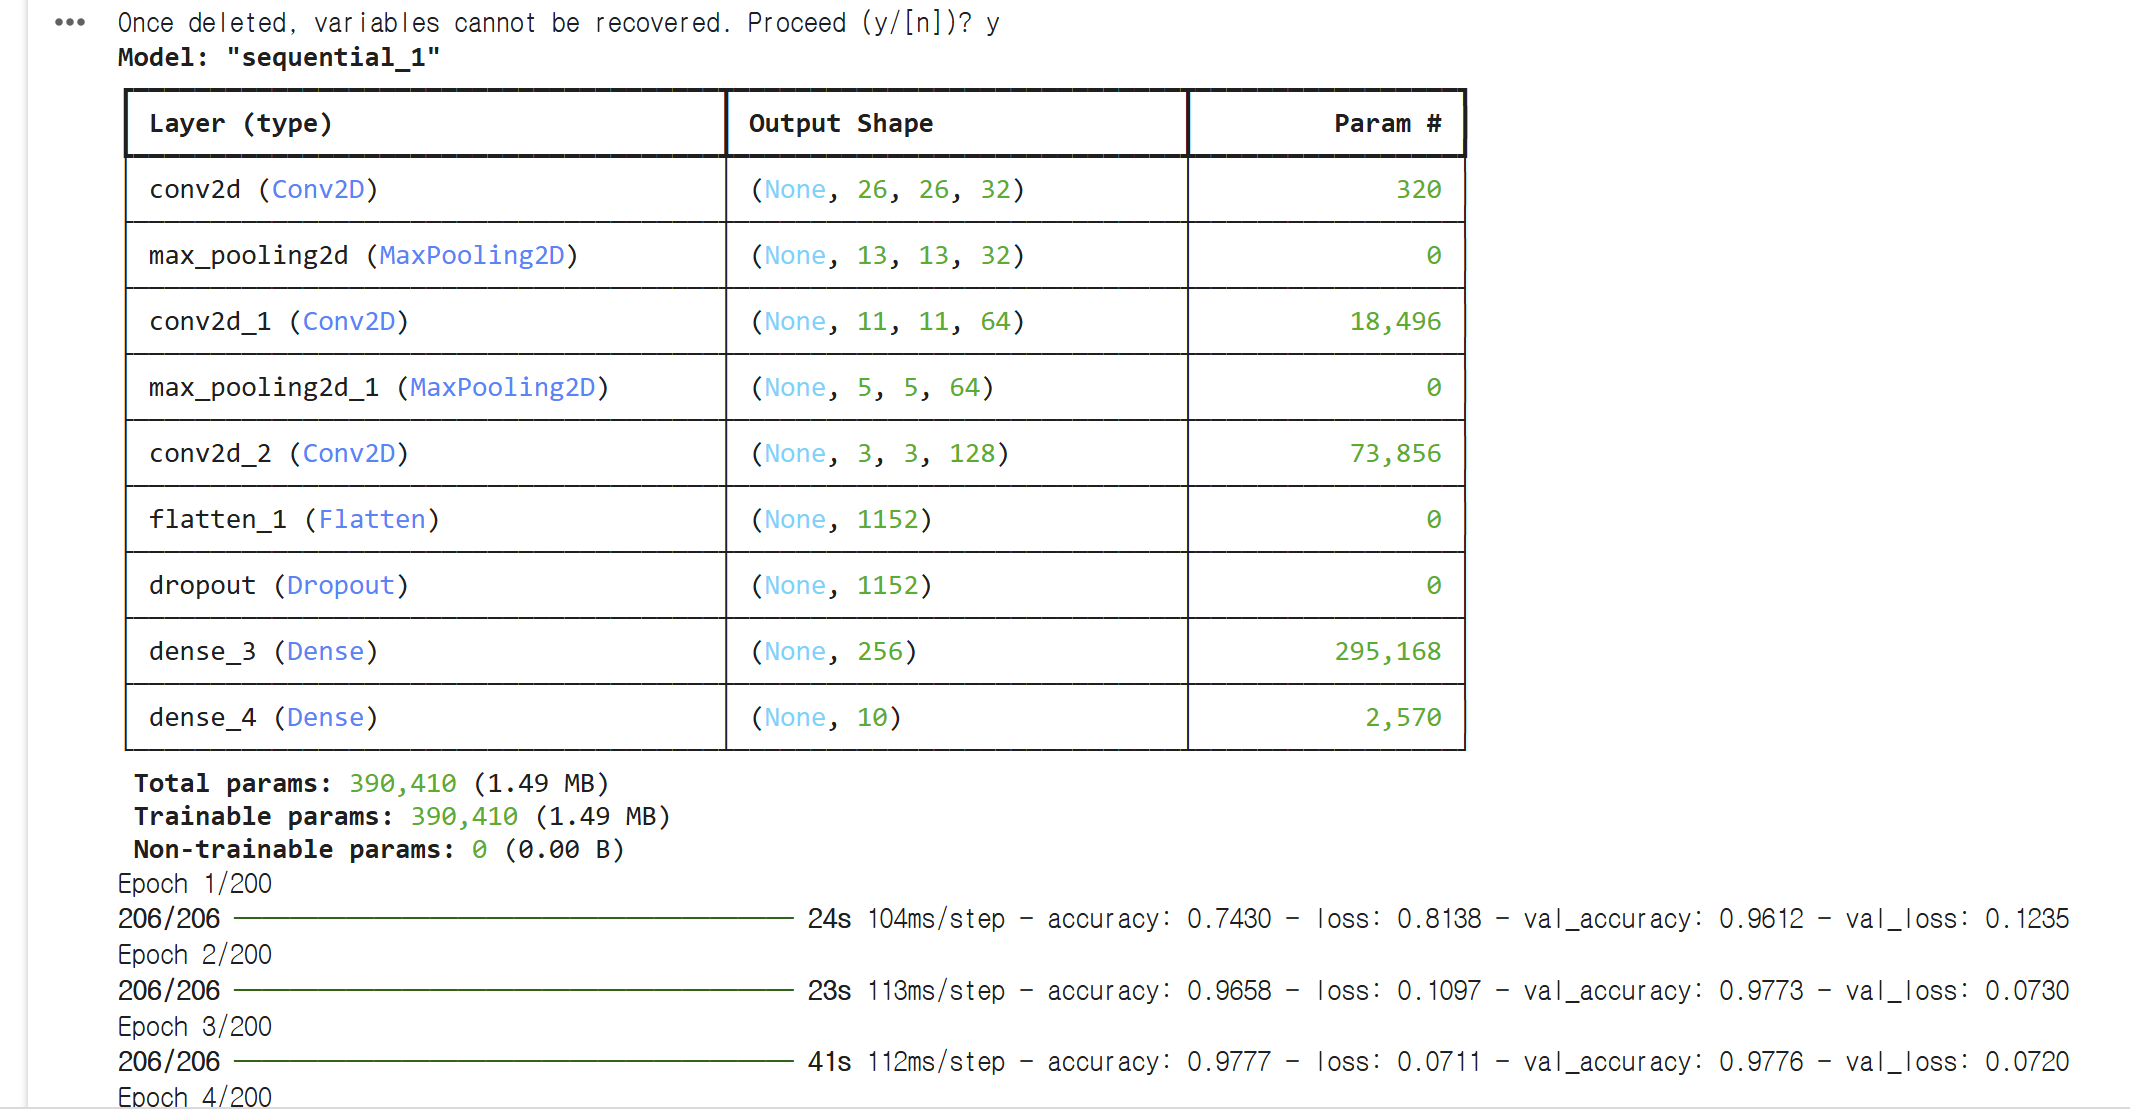
model = Sequential()

# Conv2D(필터개수, kernel_size, activation='relu')
model.add(Conv2D(filters=32,
                 kernel_size=(3,3),
                 activation='relu',
                 input_shape=(28,28,1)))

model.add(MaxPooling2D(pool_size=(2,2)))

model.add(Conv2D(filters=64,
                 kernel_size=(3,3),
                 activation='relu'))

model.add(MaxPooling2D(pool_size=(2,2)))

model.add(Conv2D(filters=128,
                 kernel_size=(3,3),
                 activation='relu'))

model.add(Flatten())
model.add(Dropout(rate=0.5))
model.add(Dense(units=256,
                activation='relu'))
model.add(Dense(units=10,
                activation='softmax'))

model.summary()

model.compile(optimizer=Adam(learning_rate=1e-3),
              loss='sparse_categorical_crossentropy',
              metrics=['accuracy'])

history = model.fit(x_data_train_norm.reshape(-1,28,28,1),
                    t_data_train,
                    epochs=200,
                    batch_size=100,
                    verbose=1,
                    validation_split=0.3
          )


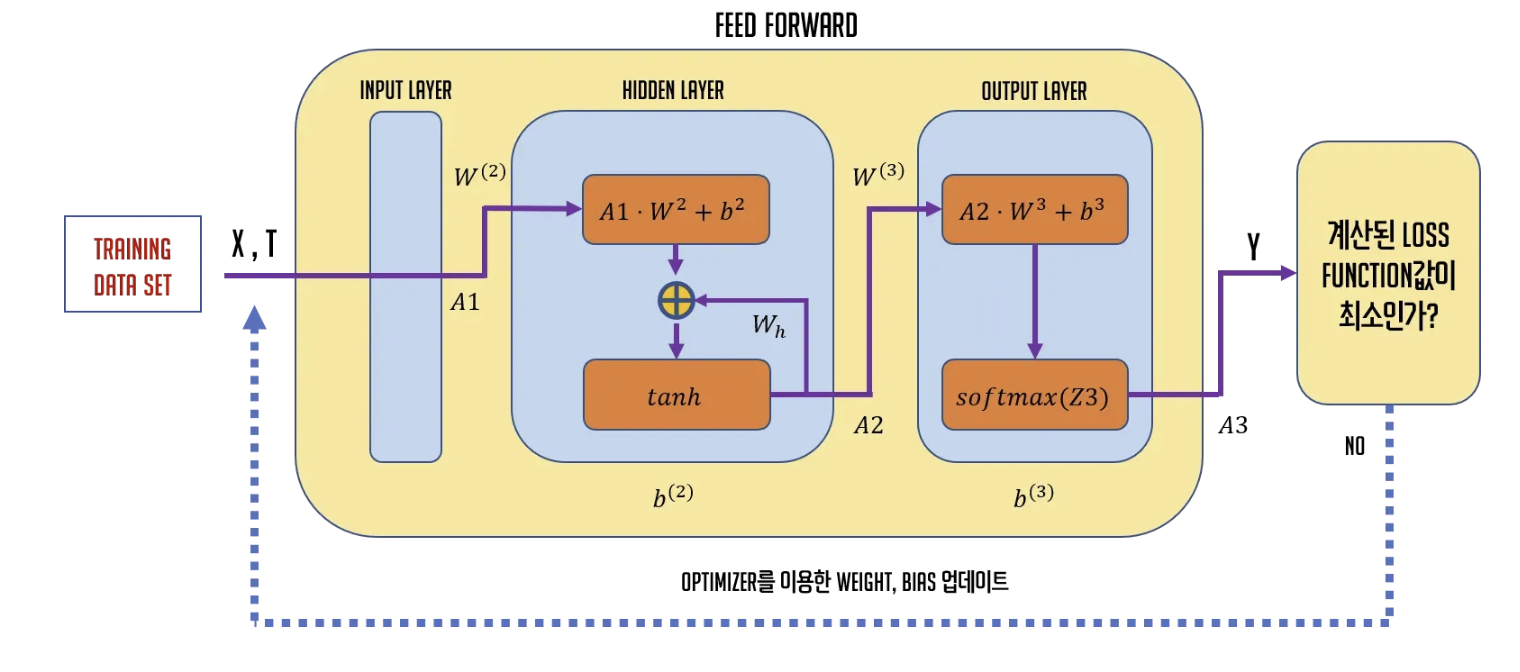
DNN, CNN, RNN 비교
특징 DNN (Deep Neural Network) CNN (Convolutional Neural Network) RNN (Recurrent Neural Network)
| 주요 데이터 유형 | 일반 데이터 | 이미지, 영상 | 순차적 데이터, 시간적 데이터 |
| 구조 | 완전 연결층 | 합성곱층, 풀링층 | 순환 연결, 히든 상태 |
| 특징 학습 방식 | 전체 데이터의 패턴 학습 | 국소적 특징 학습 | 시간적 관계 학습 |
| 강점 | 범용적 사용 가능 | 이미지의 위치 불변 특징 학습 가능 | 시간적 의존성 학습 가능 |
| 제한점 | 파라미터 수 증가로 복잡도 증가 | 시간적 관계 학습 불가 | 장기 의존성 학습 어려움 |
| 주요 응용 분야 | 데이터 분석, 추천 시스템 | 이미지 분류, 객체 탐지 | 자연어 처리, 음성 인식 |

출처: 문성훈 강사님
파인튜닝(Fine-tuning)이란?
파인튜닝(Fine-tuning)은 이미 학습된 모델(사전 학습된 모델, Pre-trained Model)을 기반으로 특정 문제에 맞게 추가 학습(전이 학습, Transfer Learning)을 수행하는 방법입니다. 이를 통해 사전 학습된 모델의 일반적인 지식을 활용하면서, 새로운 데이터셋에 맞게 모델을 조정할 수 있습니다.
파인튜닝의 특징
- 사전 학습 모델 활용:
- 대규모 데이터셋으로 학습된 모델(예: ImageNet, GPT)을 재사용.
- 기존 모델이 제공하는 특징 추출 능력을 활용하여 새로운 문제를 해결.
- 효율성:
- 데이터를 처음부터 학습하는 것보다 시간과 자원이 절약됨.
- 적은 양의 데이터로도 높은 성능을 낼 수 있음.
- 부분 학습:
- 특정 레이어만 학습하거나, 전체 모델을 재학습하는 방식으로 세밀하게 조정 가능.
파인튜닝의 주요 단계
- 사전 학습된 모델 로드:
- 이미 학습된 모델(예: ResNet, BERT 등)을 가져옴.
- 모델의 가중치와 구조를 초기값으로 설정.
- 새로운 데이터셋 준비:
- 파인튜닝할 데이터셋을 준비.
- 데이터의 도메인이 사전 학습 모델의 데이터와 다를 수도 있음.
- 모델 구조 수정:
- 기존 모델에 새로운 데이터셋에 맞는 출력 레이어를 추가.
- 필요한 경우, 일부 레이어를 고정(freeze)하거나, 모두 재학습.
- 모델 학습:
- 학습률(Learning Rate)을 낮추어 기존 가중치가 크게 변화하지 않도록 조정.
- 새로운 데이터셋으로 학습을 진행.
파인튜닝의 종류
- 특징 추출(Feature Extraction):
- 사전 학습된 모델의 일부 레이어를 고정(freeze)하여, 해당 레이어에서 추출한 특징만 사용.
- 마지막 레이어를 교체하여 새로운 데이터셋에 맞게 학습.
python코드 복사for layer in base_model.layers: layer.trainable = False # 사전 학습된 레이어 고정 - 전체 모델 재학습(Fine-tuning):
- 모델 전체를 학습 데이터에 맞게 재조정.
- 학습 데이터가 충분히 많고, 새로운 데이터셋이 사전 학습 데이터와 차이가 클 때 적합.
python코드 복사for layer in base_model.layers: layer.trainable = True # 모든 레이어 재학습 가능
review_sentences = ['내가 만들어도 이것보단 잘 만들겠다.',
                    '너무너무 재미있었습니다. 감사합니다.',
                    '아..내 돈... 돈 아까워 죽을거 같아요',
                    '아나..이것도 영화라고 만들었냐. 무슨 스토리가 산으로 가냐',
                    '감동과 재미가 같이 있는 영화입니다. 훌륭합니다.',
                    '너무너무 재미없다.. 잠와 죽는줄.',
                    '너무너무 재미있다.. 잠이 확깨네.']


df = pd.DataFrame({'document': review_sentences})


# 정규식을 활용해 영어, 한글, 띄어쓰기만 남기고 나머지 특수문자를 제거
df['document'] = df['document'].str.replace(r'[^A-Za-z가-힣ㄱ-ㅎㅏ-ㅣ ]', '', regex=True)

# 불용어(stopword)제거

okt = Okt()

def word_tokenization(text):
    stop_words = ['는', '을', '를', '이', '가', '의', '던', '고', '하', '다',
                  '은', '에', '들', '지', '게', '도']
    return [word for word in okt.morphs(text) if word not in stop_words]

data_predict = df['document'].apply((lambda x:word_tokenization(x)))

# 4. 각 문장을 숫자 벡터로 변환하여 encoding
data_predict_seq = tokenizer.texts_to_sequences(data_predict)

# 5. 동일한 문장 길이로 정리해야 합니다.
x_data_predict = pad_sequences(data_predict_seq,
                               truncating='post',
                               padding='pre',
                               maxlen=max_length)

# predict
print(model.predict(x_data_predict))

# [[0.01470953]
#  [0.9794641 ]
#  [0.01646951]
#  [0.01636818]
#  [0.9903786 ]
#  [0.008248  ]
#  [0.37347972]]
머신러닝 vs 딥러닝: 정형 데이터와 비정형 데이터 처리의 비교
특성 머신러닝 (정형 데이터) 딥러닝 (비정형 데이터)
| 데이터 유형 | 숫자, 범주형 데이터 (표 형태) | 텍스트, 이미지, 음성, 동영상 등 |
| 특징 추출 (Feature Engineering) | 사람이 수동으로 특징을 설계해야 함 | 모델이 특징을 자동으로 추출 |
| 모델 복잡성 | 상대적으로 간단한 모델 사용 | 심층 신경망 (Deep Neural Network) 사용 |
| 데이터 요구량 | 적은 데이터로도 학습 가능 | 대규모 데이터가 필요 |
| 계산 자원 | CPU로도 충분 | GPU/TPU 필요 |
| 응용 분야 | 금융, 의료, 마케팅 분석 등 | 이미지 분류, 음성 인식, 자연어 처리 등 |
'푸닥거리' 카테고리의 다른 글
| HAProxy를 활용한 Apache Worker 대체 및 고가용성(HA) 구현 가이드 (0) | 2025.01.25 |
|---|---|
| Apache Workers: 로드 밸런싱과 AJP 프로토콜 (0) | 2025.01.19 |
| 프라이빗 GPT 모델 만들기 (0) | 2023.11.18 |
| 스프링에서 데코레이터 패턴 구현하기 (0) | 2023.11.04 |
| Apache Tomcat, Java, Spring Framework 환경에서 Application Insights를 적용하는 방법 (0) | 2023.10.21 |


댓글